


As, we all know that Spring has introduced Spring Web Client for Reactive programming and Non-blocking HTTP requests. You must have already used Spring RestTemplate in your application to perform REST requests. Spring is going to deprecate the RestTemplate in Spring 6 in favour of Spring Web Client. So, it would be a great if you upgrade you application to configure and use Spring Web Client.
In this article, we'll learn about various terminologies being used in REST requests and how to configure Web Client in your Spring boot application. If you want to learn how to make CRUD API requests using webclient then visit this article.
Here we'll be using Gradle for code management. You can use Maven as well. Everything will be same.
Step 1: Generate a Demo Spring boot Application.
Go to official Spring starter website to generate Demo Spring boot application.
Fill details as per your requirement or choose from below options.
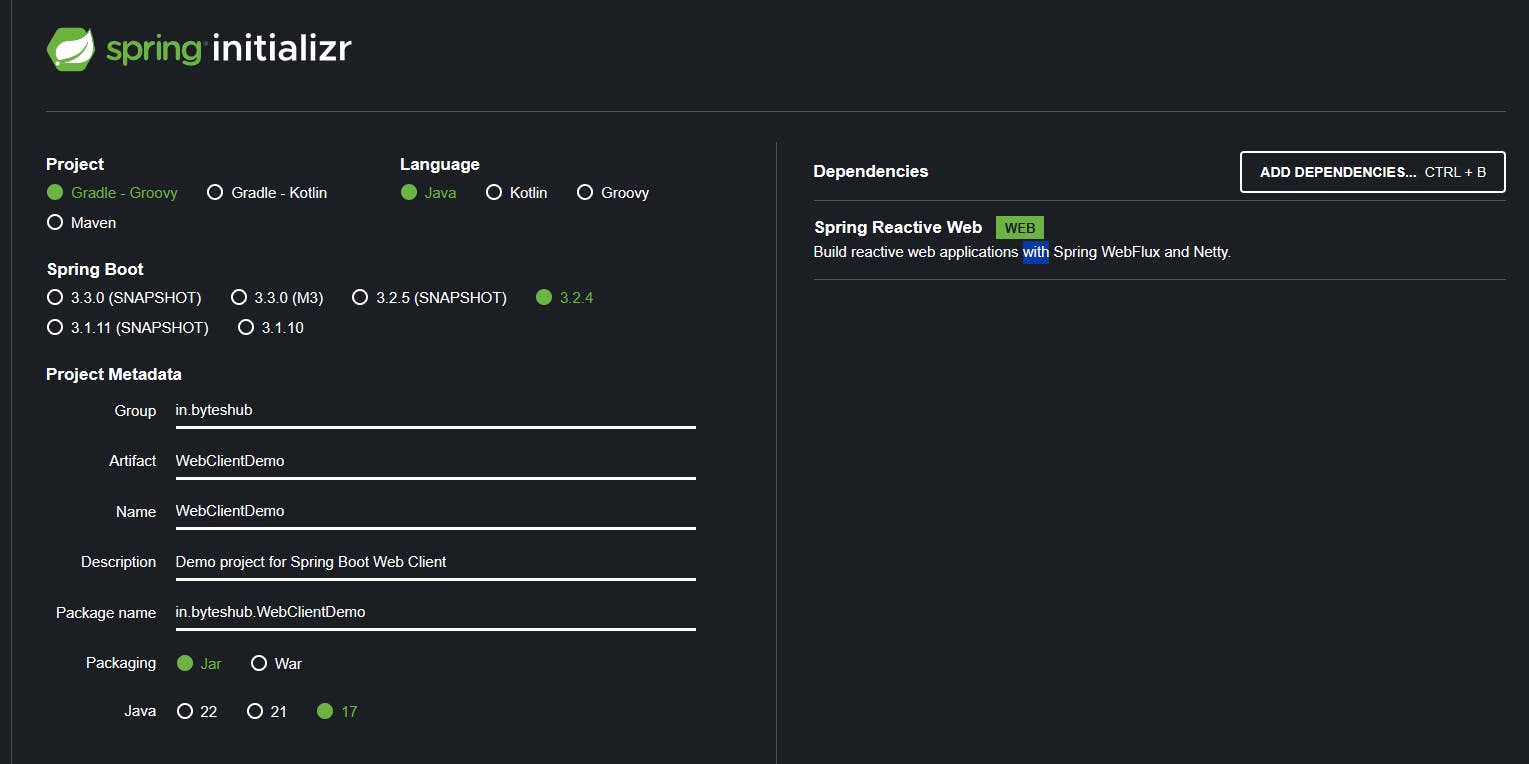
- We need to use below 2 Gradle dependencies to use Spring web client.
implementation 'org.springframework.boot:spring-boot-starter-web'
implementation 'org.springframework.boot:spring-boot-starter-webflux'
We don't need to add any other dependency. These 2 dependencies will itself provide all the required libraries to run and test our code.
Import your Spring boot project into your favourite code editor. Here, we'll be using IntelliJ. You can use Eclipse IDE as well.
Step 2: Create WebClient Configuration Class.
Create a package config in your code directory. In our case the package will be
in.byteshub.config.Create a new JAVA Class in that package with name
WebClientConfig.java.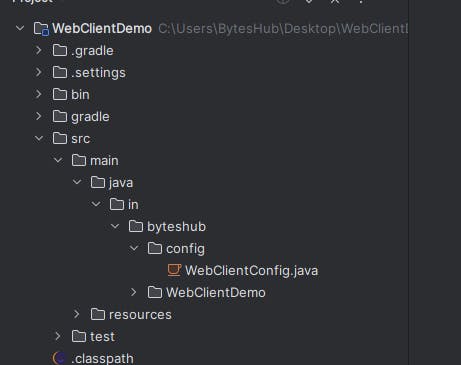
Copy the code below and paste into your
WebClientConfig.javaclass. We'll discuss about the code changes in next step.package in.byteshub.config; import org.slf4j.Logger; import org.slf4j.LoggerFactory; import org.springframework.context.annotation.Bean; import org.springframework.context.annotation.Configuration; import org.springframework.http.client.reactive.ReactorClientHttpConnector; import org.springframework.web.reactive.function.client.WebClient; import reactor.netty.http.client.HttpClient; import java.time.Duration; @Configuration //Point 1 public class WebClientConfig { //Point 2 Logger logger = LoggerFactory.getLogger(WebClientConfig.class); //Point 3 @Bean public WebClient webClient() { return WebClient .builder() .clientConnector(new ReactorClientHttpConnector(httpClient())) .build(); } //Point 4 @Bean public HttpClient httpClient(){ return HttpClient.create() .disableRetry(false) .responseTimeout(Duration.ofSeconds(90)) .keepAlive(false) .doOnConnect(config -> logger.info("WebClientConfig :: doOnConnect Method Invoked, config - {}", config)) .doOnConnected(conn -> logger.info("WebClientConfig :: doOnConnected Method Invoked, conn -> {}", conn)) .doOnRequest((req, conn) -> logger.info("WebClientConfig :: doOnRequest Method Invoked, req - {}, conn - {}",req,conn)) .doAfterRequest((req,conn) -> logger.info("WebClientConfig :: doAfterRequest Method Invoked, req - {}, conn - {}",req,conn)) .doOnResponse((res,conn) -> logger.info("WebClientConfig :: doOnResponse Method Invoked, res - {}, conn - {}", res,conn)) .doAfterResponseSuccess((req,conn) -> logger.info("WebClientConfig :: doAfterResponseSuccess Method Invoked, req - {}, conn - {}",req,conn)) .doOnDisconnected(conn -> logger.info("WebClientConfig :: doOnDisconnected Method Invoked, conn -> {}",conn)) .doOnRequestError((req,err) -> logger.error("WebClientConfig :: doOnRequestError Method Invoked, req - {}, err - {}", req, err.getMessage())) .doOnResponseError((req,err) -> logger.error("WebClientConfig :: doOnResponseError Method Invoked, req - {}, err - {}", req, err.getMessage())); } }
Step 3: Know About Configuration Code
Let's discuss about what we have written in the code and try to understand the same. Please focus on Points in comments in above code.
At Point 1, we have annotated the class with
@Configurationannotation. In Springboot, whenever we need to create any configuration then we have to denote that class with@Configurationannotation to let spring understand that some configurations are defined in this class and should be picked at the time boot run (start) the application.At Point 2, We have created a Logger object from slf4j library to display some logs while executing our code.
You can also use @Slf4j annotation at class level to include logger object directly but make sure to include lombok dependency in
build.gradlefile.
At Point 4*(will talk about Point 3 in next step)*, we have created a spring bean of
HttpClientwith@Beanannotation. This is important part of config changes as we can define various custom configuration in this which will be used at the making REST requests. Let's see what we have defined in above method -disableRetry(false) - This is used for disabling the retrying of REST requests for once. If set to
true, then only one request is made and retry would not happen in case of non-response. If set tofalse, another one time retry would happen for the same request in case of non-response on first time.responseTimeout(Duration.ofSeconds(90)) - This is used for setting the time (usually in seconds or milliseconds) which describes that how long it should wait after making the request to destination server to get the response. If it takes longer than specified time to return response, then a timeout error will be thrown.
keepAlive(false) - This is used to configure that whether we want to keep the current request as active (alive) or not.
doOnConnect - This accepts a BiConsumer function in which you define any operation or task which you would like to perform when HTTP connection is about to connect.
doOnConnected - This accepts a consumer function in which you can define an operation or task which can be executed when HTTP connection is established.
doOnRequest - This accepts a BiConsumer function in which you define any operation or task which you would like to perform at the time of making request to destination server.
doAfterRequest - This accepts a BiConsumer function in which you define any operation or task which you would like to perform after making the request to destination server.
doOnResponse - This accepts a BiConsumer function in which you define any operation or task which you would like to perform at the time of receiving response from destination server.
doAfterResponseSuccess - This accepts a BiConsumer function in which you define any operation or task which you would like to perform after getting
SUCCESSresponse with status code OK (200) from server.doOnDisconnected - This accepts a consumer function in which you define any operation or task which can be executed after performing all the operation and request is closed and connection is lost.
doOnRequestError - This accepts a BiConsumer function in which you define any operation or task which you would like to perform if you encounter some error while making the request to destination server. It is best for logging error or throwing exception.
doOnResponseError - This accepts a BiConsumer function in which you define any operation or task which you would like to perform if you encounter some error while receiving the response from server. It is best for logging error or throwing exception.
All the above methods such as
doOnConnect,doOnConnectedand other can be used for audit logging purpose.
- At Point 3, We have created a spring bean of
WebClientwith@Beanannotation. We're using builder() method ofWebClientand configuring a clientConnector to customize the connection configuration. For clientConnector we'll be passing the theHttpClientbean that we have created in previous step toReactorClientHttpConnector. This connector is best for reactive programming in springboot.
Step 4: Summary & Next Step
Now, we have completed the Web Client configuration and are ready to use it to make REST requests. Learn about how we can different requests such as GET, POST, PUT, DELETE etc using WebClient. What are synchronous and asynchronous requests. See Article Here.
Feel free to drop an email on official@byteshub.in to request article on any choice of yours. Connect with me on my LinkedIn Rohan Sanger for collaboration/feedback.
Don't forget to join our FREE telegram channel for latest updates on articles. Join here.